MilkyDawn User Manual
What is MilkyDawn?
MilkyDawn is a real-time audio visualizer for Windows. It listens to whatever music is playing on your computer and generates synchronized visual effects on screen — no cables, no complicated setup.
MilkyDawn comes with over 110 visualization modes, ranging from waveform scopes and particle systems to generative art and abstract geometry. Every mode reacts to your music in real time, and you can shape the visuals using five parameter knobs, color palettes, and post-processing effects.
Whether you’re a VJ performing live, a musician creating visuals for your tracks, or someone who simply loves watching music come alive — MilkyDawn has you covered.
Key Features
- 110+ visualization modes — built-in presets plus the full EYESY OS v3 library by Critter & Guitari
- Zero-config audio capture — automatically captures your system audio via WASAPI loopback
- 5 parameter knobs — shape every visual in real time
- Auto Modulation — let the visuals evolve on their own, driven by the beat
- Color palettes — create and save custom color schemes
- Post-processing effects — CRT retro effect, film grain, cinema 24fps mode
- Multi-monitor support — fullscreen, span, and mirror modes
- Video recording — capture your visuals as MP4 video with synchronized audio
- Offline rendering — render frame-perfect videos from audio files
System Requirements
| OS | Windows 10 or later (64-bit) |
| Audio | Any audio output device (speakers, headphones, audio interface) |
| Display | Any resolution; multi-monitor supported |
| Storage | ~100 MB for the application |
Note: MilkyDawn captures audio using Windows WASAPI loopback — it listens to whatever your computer is playing. No additional audio routing software is needed.
Installation
- Download the MilkyDawn installer.
- Run the installer and follow the on-screen instructions.
- Launch MilkyDawn from the Start Menu or desktop shortcut.
That’s it — no additional software or drivers are required. The video encoder (ffmpeg) is bundled with the installer.
Getting Started
First Launch
When you launch MilkyDawn for the first time, a device selection screen appears. This is where you choose which audio device MilkyDawn should listen to.
- Use the Up/Down arrow keys to highlight a device.
- Press Enter to confirm your selection.
- For most users, select your default output device (speakers or headphones) — it will be marked
[Default].
Once selected, MilkyDawn remembers your choice. You can change the audio device later in the Settings tab.
Two Windows
MilkyDawn uses two windows:
- Visualizer Window — the main display where visuals are rendered. This is the window you’ll want fullscreen or projected.
- Control Panel — a compact settings window where you adjust parameters, switch modes, and configure the app.
Start playing music on your computer, and you should immediately see the visualizer respond. If you don’t see any movement, check the Settings tab to make sure the correct audio device is selected.
The Control Panel
The Control Panel is your command center. It has four tabs: Main, Palette, Settings, and Rec.
Main Tab
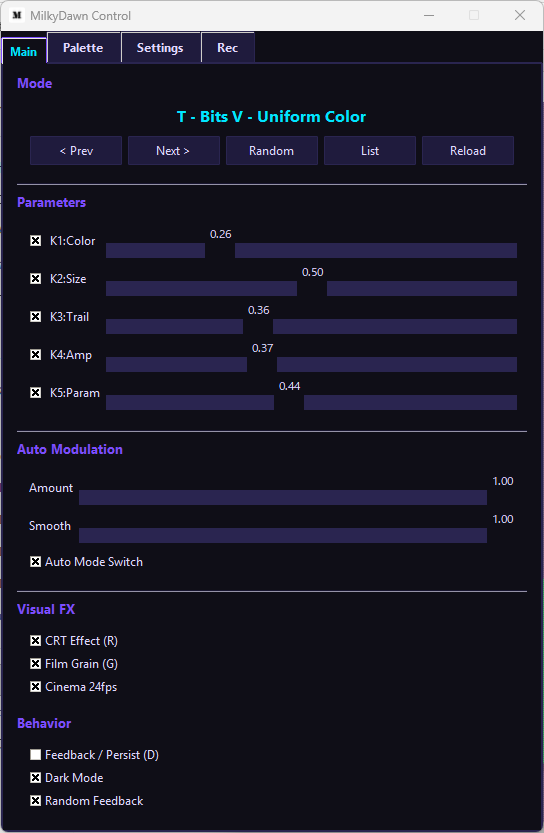
The Main tab is where you’ll spend most of your time. It controls the active visualization mode and all real-time parameters.
Mode
The Mode section at the top shows the currently active visualization. Use the navigation buttons to browse:
- < Prev / Next > — step through modes one at a time
- Random — jump to a random mode
- List — open the Preset List browser (see below)
- Reload — reload the current mode from disk (useful if you’ve edited the mode’s Python file)
Modes are organized by prefix:
- S – Scope modes (waveform-based, ~80 modes)
- T – Trigger modes (generative/pattern-based, ~27 modes)
- Unprefixed names (Horizon, Lissajous, MilkyDawn, Ring, Spectrum) are MilkyDawn’s built-in original presets.
Parameters (Knobs K1–K5)
Five sliders control how the current mode looks and behaves:
| Knob | Typical Use |
|---|---|
| K1: Color | Controls color selection or hue |
| K2: Size | Controls the size or scale of visual elements |
| K3: Trail | Controls trailing / persistence amount |
| K4: Amp | Controls amplitude or intensity of audio reaction |
| K5: Param | Extra parameter (varies by mode) |
Each knob ranges from 0.00 to 1.00. The exact effect depends on the active mode — experiment freely! The checkbox next to each knob enables Auto Modulation for that knob (see below).
Your knob positions are saved automatically and restored when you relaunch MilkyDawn.
Auto Modulation
Auto Modulation makes knobs drift automatically in response to musical beats, creating an ever-evolving visual experience without manual input.
- Checkboxes (next to each knob) — enable auto modulation for individual knobs
- Amount — how far the knobs drift on each beat (0.00 = no drift, 1.00 = maximum)
- Smooth — how smoothly knobs transition to new values (0.00 = instant snap, 1.00 = slow, gentle drift)
- Auto Mode Switch — when enabled, MilkyDawn automatically switches to a new visualization mode on beat
Tip: For a “set it and forget it” experience, enable all five knob checkboxes, set Amount to 0.5–1.0, Smooth to 0.7–1.0, and turn on Auto Mode Switch. MilkyDawn will continuously evolve through different modes and parameter combinations on its own.
Visual FX
Three post-processing effects you can layer on top of any mode:
- CRT Effect (R) — simulates a vintage CRT monitor with pixelation, bloom glow, and scanlines. Toggle with the R key.
- Film Grain (G) — adds a subtle animated film grain overlay for a cinematic look. Toggle with the G key.
- Cinema 24fps — limits rendering to 24 frames per second for a film-like motion cadence.
Behavior
- Feedback / Persist (D) — when enabled, the screen is not cleared between frames. Previous frames accumulate, creating trails and feedback effects. Toggle with the D key.
- Dark Mode — uses a black background instead of the mode’s default background.
- Random Feedback — when Auto Mode Switch is on, there’s a chance that Persist mode is randomly toggled when switching modes, adding variety.
Palette Tab
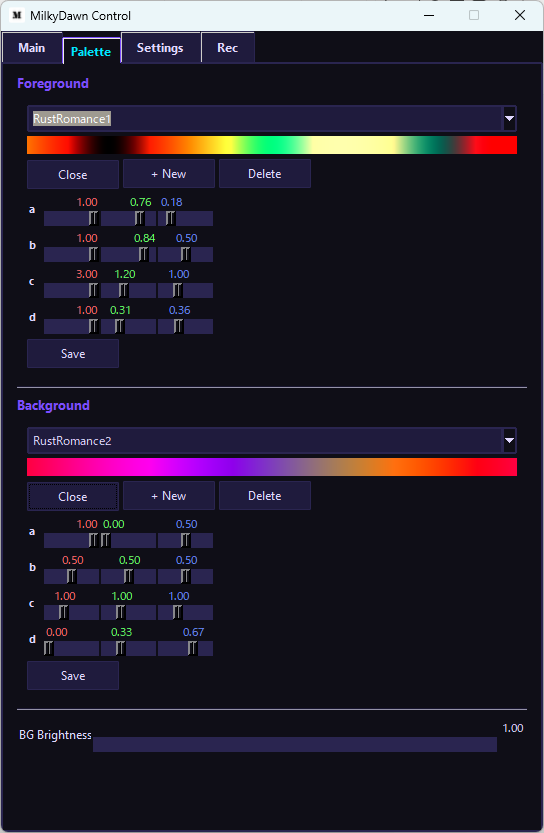
The Palette tab lets you customize the colors used by visualization modes. MilkyDawn uses a mathematical color system based on cosine gradients, which can produce an enormous range of color palettes from just a few parameters.
Foreground & Background
Each palette has two independent color sets:
- Foreground — colors used for the main visual elements (lines, shapes, particles)
- Background — colors used for the background fill
Select a palette from the dropdown menu to load it. The color bar below the dropdown shows a preview of the gradient.
Palette Controls
- Close — collapse the palette editor
- + New — create a new palette based on the current parameters
- Delete — remove the selected palette
- Save — save changes to the current palette
Cosine Gradient Parameters (a, b, c, d)
Each row (a, b, c, d) has three sliders controlling the Red, Green, and Blue channels. These four rows define the mathematical formula that generates the gradient:
- a — base color (offset)
- b — amplitude (color range)
- c — frequency (how many color cycles)
- d — phase (shifts the starting point of each color channel)
Don’t worry about the math — just move the sliders and watch the color bar update in real time. Small changes can produce dramatically different results.
BG Brightness
The BG Brightness slider at the bottom controls the overall brightness of the background color. Set it to 0 for a pure black background, or increase it to let the background palette colors show through.
Settings Tab
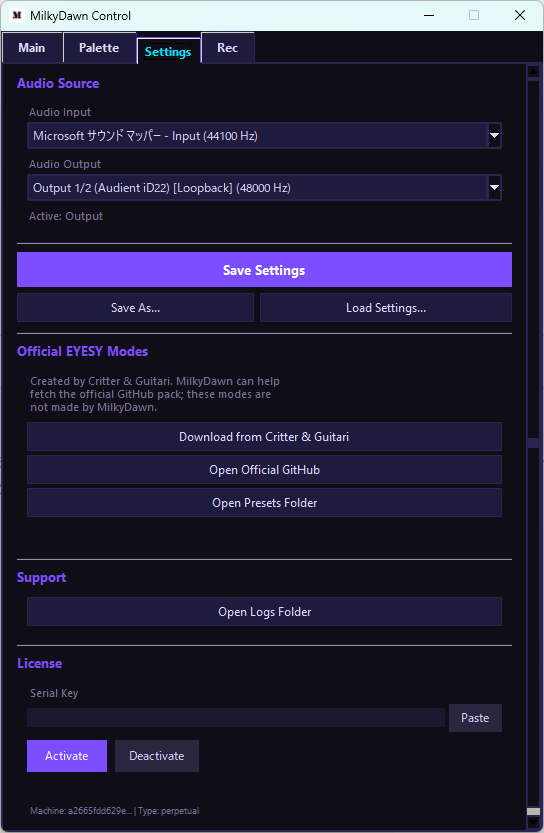
Audio Source
Configure which audio device MilkyDawn listens to:
- Audio Input — select a microphone or line-in device for live audio input
- Audio Output — select an output device to capture via WASAPI loopback (captures whatever is playing through that device)
The Active label shows which source type is currently being used. For most users, “Output” mode (loopback) is the easiest — it captures system audio with no extra wiring.
Settings Management
- Save Settings — save all current settings (knobs, mode, palette, effects, device) to the default settings file
- Save As… — save settings to a custom file (useful for creating different configurations)
- Load Settings… — load a previously saved settings file
Official EYESY Modes
MilkyDawn is compatible with the EYESY OS v3 visualization modes created by Critter & Guitari. These modes are not made by MilkyDawn but run natively within the app.
- Download from Critter & Guitari — automatically fetch and install the official EYESY mode pack
- Open Official GitHub — visit the EYESY modes repository on GitHub
- Open Presets Folder — open the folder where modes are stored on your computer
Support
- Open Logs Folder — open the folder containing MilkyDawn’s log files (useful for troubleshooting)
License
Enter your serial key to activate MilkyDawn:
- Paste your serial key into the text field (or click Paste to paste from clipboard).
- Click Activate.
- To deactivate (e.g., when moving to a new computer), click Deactivate.
The bottom of this section shows your Machine ID and license type.
Rec Tab
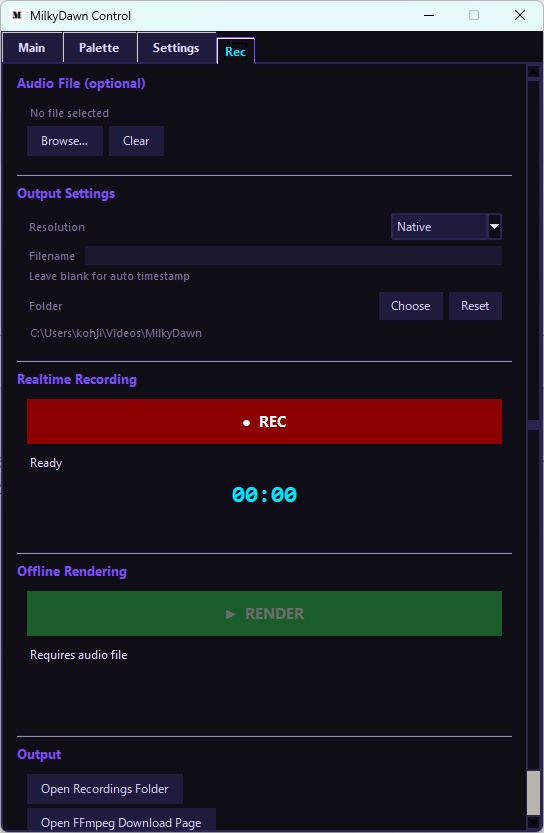
The Rec tab lets you capture your visuals as MP4 video files.
Audio File (optional)
You can optionally load an audio file to use as the audio source for recording:
- Browse… — select an audio file (WAV, MP3, FLAC, etc.)
- Clear — remove the loaded audio file
If no audio file is loaded, MilkyDawn records using live system audio.
Output Settings
- Resolution — choose the output video resolution:
- Native — matches your current visualizer window size
- 1920×1080 (Full HD)
- 1280×720 (HD)
- 960×540
- Filename — enter a custom filename, or leave blank to use an automatic timestamp
- Folder — choose where to save recordings (defaults to
Videos\MilkyDawn)
Realtime Recording
Click the red ● REC button to start recording. MilkyDawn captures the visualizer output in real time along with audio. Click the button again to stop. The elapsed time is shown below the button.
Offline Rendering
Offline rendering creates a frame-perfect video from an audio file. Unlike realtime recording, every frame is rendered without dropping — the result is perfectly synchronized regardless of your computer’s performance.
- Load an audio file using Browse… above.
- Click ► RENDER to start offline rendering.
- MilkyDawn processes the audio file and renders each frame sequentially.
Note: Offline rendering requires an audio file to be loaded. The render may take longer than the audio duration, but the result will be perfectly synced.
Output
- Open Recordings Folder — open the folder where your recorded videos are saved
- Open FFmpeg Download Page — if ffmpeg is not found, you can download it here
Preset List
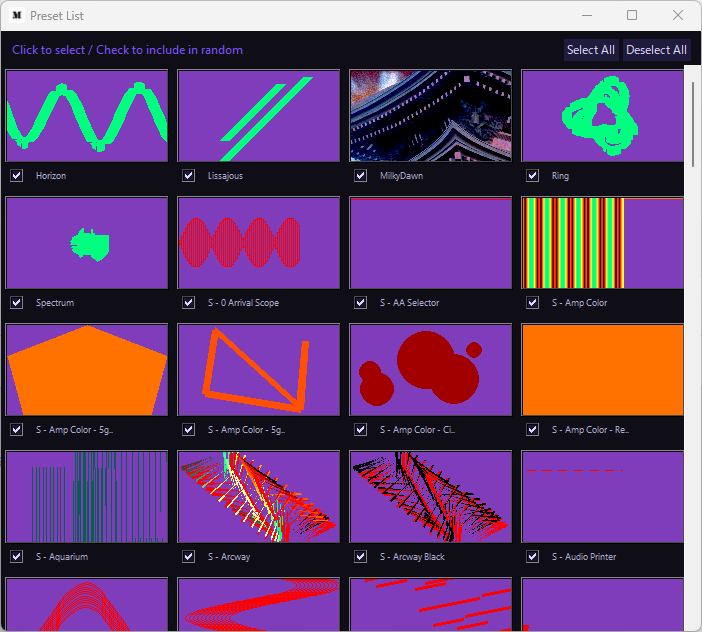
Click the List button on the Main tab to open the Preset List — a visual browser showing all available modes as thumbnails.
How to Use
- Click a thumbnail to immediately switch to that mode.
- Checkbox (bottom-left of each thumbnail) — controls whether this mode is included when using Random mode or Auto Mode Switch. Uncheck modes you want to skip.
- Select All / Deselect All — quickly include or exclude all modes.
This is useful for curating a set of modes for a live performance — uncheck the ones you don’t want, and Random/Auto will only cycle through your selected modes.
The Visualizer Window
The visualizer window is where MilkyDawn renders its visuals. You can interact with it using keyboard shortcuts and the right-click menu.
Keyboard Shortcuts
| Key | Action |
|---|---|
| ESC | Exit MilkyDawn |
| TAB | Next visualization mode |
| Shift + TAB | Previous visualization mode |
| H | Toggle HUD overlay (shows mode name, FPS, volume meter) |
| R | Toggle CRT effect |
| G | Toggle film grain effect |
| F | Toggle fullscreen |
| D | Toggle Feedback / Persist mode |
| Right-Click | Open display mode menu |
HUD Overlay
Press H to show the HUD (Heads-Up Display). It shows:
- The name of the current visualization mode
- Current FPS (frames per second)
- Active status flags (PERSIST, DARK, etc.)
- A volume meter showing audio input level
- The active audio device name
- A quick-reference shortcut guide
The HUD is hidden by default to keep the visual output clean.
Display Modes
Right-click the visualizer window to access display mode options:
| Mode | Description |
|---|---|
| Windowed | Default 1280×720 resizable window |
| Screen 1, 2, … | Fullscreen on a specific monitor at its native resolution |
| Fullscreen (Span) | Stretches visuals across all connected monitors as one unified display |
| Fullscreen (Mirror) | Shows the same visuals on every monitor, scaled to fit each screen |
Span mode is great for ultra-wide setups or projection mapping across multiple surfaces. Mirror mode is ideal when you want the same visual on a stage monitor and a projector.
Adding Your Own Modes
MilkyDawn can load custom visualization modes written in Python. To add your own:
- Open the presets folder (Settings tab → Open Presets Folder).
- Create a new folder with your mode’s name.
- Inside that folder, create a file called
main.py. - Implement two functions:
def setup(screen, etc):
    # Called once when the mode is selected
    pass

def draw(screen, etc):
    # Called every frame (~60 times per second)
    # Use etc.knob1 through etc.knob5 for parameters (0.0–1.0)
    # Use etc.audio_in for the raw waveform
    # Use etc.audio_fft for the frequency spectrum
    pass
- Click Reload on the Main tab or restart MilkyDawn to load your new mode.
MilkyDawn is fully compatible with EYESY OS v3 modes — you can find community-made modes on the Critter & Guitari forum and use them directly.
Tips & Tricks
- Quick fullscreen: Press F to instantly go fullscreen on your primary monitor. Right-click to choose a different monitor.
- Hands-free mode: Enable Auto Modulation on all knobs + Auto Mode Switch for a fully autonomous visual show.
- Clean recordings: Use Offline Rendering for the best quality — it ensures every frame is rendered perfectly with no drops.
- Live performance: Use the Preset List to uncheck modes you don’t want, then use TAB or Random to cycle through only your curated selection.
- Combine effects: Try CRT Effect + Film Grain + Cinema 24fps together for a vintage analog video look.
- Feedback art: Enable Persist mode (D) and slowly move the knobs to create evolving, layered compositions.
- Save your setup: Use Settings → Save As… to create named presets for different venues or moods.
Troubleshooting
No visuals are moving / no audio response
- Make sure music is actually playing on your computer.
- Check the Settings tab — verify the correct audio output device is selected.
- If using headphones or an audio interface, make sure it’s selected as the output device.
- Press H to show the HUD and check the volume meter — if it’s not moving, MilkyDawn isn’t receiving audio.
The visualizer is black
- Some modes start with a blank screen at certain knob positions. Try moving the knobs (especially K4: Amp).
- If Dark Mode is enabled, try disabling it.
- Press TAB to switch to a different mode.
Recording button is grayed out / recording doesn’t work
- Make sure ffmpeg is available. If MilkyDawn was installed via the installer, ffmpeg should be bundled. Otherwise, click Open FFmpeg Download Page in the Rec tab.
- Check that the output folder exists and is writable.
Performance is slow / low FPS
- Close other GPU-intensive applications.
- Try a smaller window size (avoid Span mode on very high-resolution multi-monitor setups).
- Disable CRT Effect and Film Grain — these add processing overhead.
Audio device not found
- Make sure your audio device is connected and enabled in Windows Sound settings.
- Restart MilkyDawn after connecting a new audio device.
- Some devices may not support WASAPI loopback — try selecting a different output device.